How to Enhance Case Studies with Tours in VB Suite
Posted on 5/17/24 by Sarah Boudreau
Case studies are a great way to engage with students, allowing them to see “real world” applications for the content they learn in the classroom as they test their clinical reasoning skills. With Tours in Visible Body Suite, case studies can be even more engaging!
In this blog post, we’ll show you how to create a custom Tour to accompany a case study.
A Tour is a connected series of saved Views—think of it as a custom, interactive 3D presentation. Tours give students more ways to learn and explore, and they give instructors more tools with which to present the case study.
How do Tours enhance case studies? Say I’m a student looking at a case study involving PCOS. In addition to the text of the case study, I have an interactive 3D model to explore! I could click on the cortex to read a definition, learning about the different makeups of the cortex and the inner ovarian medulla. I could also add tags to identify the germinal epithelium and tunica albuginea at a glance. Using the related content box, I could access the ovarian cycle model to compare the PCOS pathology model with a healthy ovary.

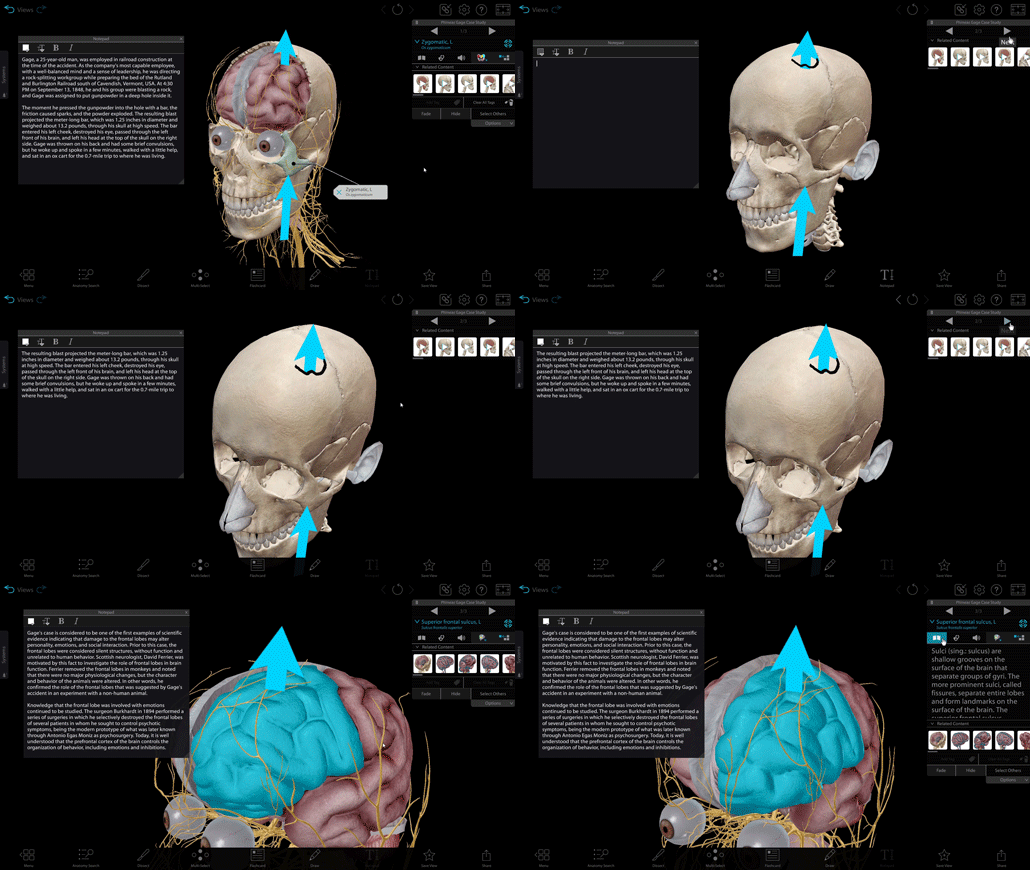
A custom Tour in VB Suite.
With Tours, students have more information at their fingertips to augment the case study experience.
Step 1: Select your model(s)
The first step is to find models that can be used to illustrate your case study. Luckily, VB Suite makes it easy to find the content you want.
The simplest way to find models is to use the search tool—just click on the Search tab at the top of your screen to search VB Suite’s vast library. Results are then organized by asset type.
For example, let’s say my case study is about a rotator cuff injury. When I type “rotator cuff” into the search bar, I immediately see gross anatomy models, pathology models, an animation, and a muscle action all involving the rotator cuff.
For a more detailed walkthrough on VB Suite’s menu and search system, check out the video below.
Step 2: Customize your View
Once you’ve selected a model, it’s time to customize! There are many ways to customize your View in VB Suite.
Notepad. The Notepad is a core part of the case study Tour experience! Use the Notepad to add text to your View. You can adjust the font size and color, and you can add italics and bold formatting.
Draw. Using the Draw tool on the bottom toolbar, you can draw and annotate on a 3D canvas! You can add squares, circles, arrows, and freeform drawings in a variety of colors. Use this tool to highlight specific structures or elements from your case study. In the example below, we’ve used arrows to show entry and exit wounds.

A custom Tour in VB Suite.
Add tags. Click on a structure and then select “Add Tag” in the info box. Click, hold, and drag your tag to reposition it.
Hide or fade anatomy. Fading a structure will make it transparent, and hiding it will get rid of it altogether. To hide or fade a structure, select it and click “Fade” or “Hide” in the info box below the “Add Tag” button. You can also use the Dissect tool on the bottom toolbar to hide structures: when the Dissect tool is selected, simply click on a structure to hide it.
Step 3: Save
Once you’ve decked out your view with annotations, it’s time to save it! Click “Save View” on the bottom toolbar and add a name to your View. You can also add keywords to help you find it later.
Once you’ve created one saved View, create more Views to cover all the content in your case study.
Step 4: Create a Tour out of saved Views
Once you’ve got all of your Views created, it’s time to combine them into a Tour!
To do this, select the My Library tab at the top of the main menu. Next, select Tours and click the green “New Tour” button at the bottom of the screen.
Select the Views you want to add to your Tour and click Next. Here, you’ll find the Preview page, where you can add, remove, and reorder the Views if you wish.
When you’re done, click Save and give your Tour a name. Ta-da! You’ve created a Tour.
Step 5: Share your Tour
You’ve created a Tour, so your next step is to share it with your students. You can share your Tour in a few ways.
Share link or QR code. Click the three dots on your Tour’s thumbnail, then select Share Tour from the menu that pops up.
From here, you can download a QR code students can access with their mobile device, or you can copy the Share Link.
On mobile, students can scan the QR code with their camera. On mobile or desktop, students can click the “Launch Link” button (located in the bottom bar of the main menu) and paste in the link. Either option will bring students straight to the Tour!
QR codes are a fun way to enhance classroom materials—for some QR code inspiration, check out our blog post 3 Ways to Use QR Codes in the Classroom with Visible Body Suite.
Assign in Courseware. If you use Courseware, you can assign Tours to your students!
Start by navigating to your course and clicking the “Create New Assignment” button. Next, select “Human Anatomy (Visible Body Suite)” as the source for your assignment and click Continue.
Scroll down and select My Library. On the right, find your Tour and click the checkbox to select it. Then, click Continue to add a name, due date, description, and other details to your assignment. Hit Publish at the bottom of your screen to publish the Tour assignment for all your students to see.
VB Suite case study featured in the Forensic Science Lesson Plan Part II: Autopsies with Visible Body blog post.
Read more
Now you know all you need to enhance case studies with Tours! For more teaching tips and tricks, check out these blog posts:


Be sure to subscribe to the Visible Body Blog for more anatomy awesomeness!
Are you an instructor? We have award-winning 3D products and resources for your anatomy and physiology course! Learn more here.


