

Free Lesson Plan: Types of Bones
In this teaching guide, we’ll cover how to teach types of bones with Visible Body Suite, the most complete and easy-to-use 3D human body reference and study tool.
Visible Body Suite comes as part of Courseware, a teaching and learning platform that allows instructors to share and assign 3D content and more. Courseware can be used as a standalone LMS or can be integrated with Canvas or Blackboard.
In this guide, we’ll suggest 3D interactive models to use, anatomical features to point out, and methods to review information, including practical applications. To do this, we’ll use Visible Body Suite's Tours and Flashcards features.
How to use this lesson plan
This lesson uses several features in Visible Body Courseware. All relevant content is already loaded into Courseware and ready to go!
If you don’t have access to Courseware yet, reach out to our team for a free instructor trial!
If you already have Courseware, follow these steps to add this folder to your course:
- Click on this link to add the lesson plan material to your Courseware account
- In this new course, click on the Bulk Editing tool, select the relevant folder(s) and click Copy. Choose the destination course and folder and copy.
- Navigate to your existing course, where you will find the content you copied. Use the bulk editing tool to edit release and due dates and publish. If you have Canvas deep integration set up, deploy to Canvas.
Once this lesson content is copied to your account, you can customize it to fit your class’s unique needs!
Accessing the Tour and Flashcard Deck on mobile
Instructors and students who use Courseware also get access to the Visible Body Suite mobile app (previously known as Human Anatomy Atlas 2023 +), which is great for studying on the go. Scan the QR codes below with your smartphone to access the Tour and Flashcard Deck on the mobile app and save it to your account that way.


If you have the Visible Body Suite mobile app, use the camera app on your phone to scan the codes above!
Did you know that you can use Visible Body Suite to generate QR codes for your classroom? You can link students to app content like custom views, Tours, Flashcard Decks with a few clicks.
What are bones made of?
A great way to start the lesson is by going through the basics: what are bones made of?
The osteon and sectioned femur microanatomy models will help you zoom in and illustrate the composition of bones. Check out the bone structure video below for some lecture inspiration!
While students don’t necessarily need to understand bone composition to understand types of bones, starting here is a good way to warm up. You can make connections between different body systems by pointing out the arterial system that supplies blood to the bone tissue.
The axial and appendicular skeletons
To teach the differences between the axial and appendicular skeletons, show students the full skeleton model (Views > Systems > Skeletal System Views > 1. Full Skeleton).
Students might not know that the skeletal system is actually divided into two categories, the axial skeleton and the appendicular skeleton. Explain to your students why the skeletal system is divided in this way: the axial skeleton supports and protects the organs while the appendicular skeleton supports limb function.
Want to show the axial or appendicular skeleton but don’t want to spend time individually selecting hundreds of bones? Here’s a pro tip: Go to the full skeleton view, click on the Anatomy Search button on the toolbar, and search “axial” or “appendicular.” Click on the first result and the entire axial or appendicular skeleton will be selected! You can also select any bone and use the hierarchy tool in the info box to select the part of the skeleton it belongs to.
Review this information with a quick Flashcard round! It takes a few seconds to create a Flashcard to quiz students on which skeleton a bone belongs to—or you can use the Deck that corresponds to this guide. The first eight Flashcards in the Deck (1-8) are on the axial vs. appendicular skeleton.
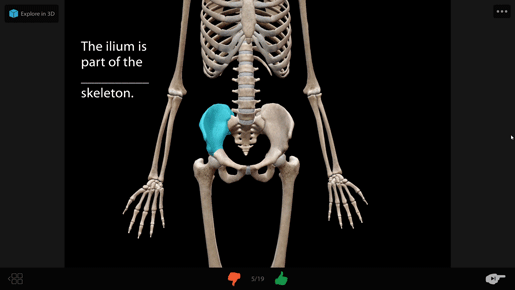
A Flashcard in Visible Body Suite in Courseware.
Project the Flashcard Deck on the screen you use for lecturing and have the whole class call out the answer on the count of three, then flip the Flashcard to reveal the correct answer.
Types of bones
Next, walk students through the different types of bones, focusing on their shapes and functions. This is where the draw tool comes in handy: use this tool to draw arrows, circle structures, and create other annotations to emphasize your points as you lecture.
We’ll go through the types of bones and give you some ideas for how to teach each type. At the end of this post, you'll also find a link to our Types of Bones eBook, which is a great study resource!
Long bones
Long bones are longer than they are wide, and you can illustrate this point by using the draw tool to draw lines as if you were measuring the length and width of the bone.
Long bones also support weight and facilitate movement—this is where Visible Body Suite’s interactive 3D muscle animations can shine! Under Views, choose the Muscle Actions tab. Any of the muscle actions here involving limbs can illustrate the function of long bones. Show students how muscle attachments and lever systems facilitate movement.
Short bones
Similar to the long bones section, show students how short bones are cube shaped and about as long as they are wide through the draw tool. Since short bones are responsible for stability and some movement, show students the 3D muscle action animation for wrist flexion. Focus on the carpal bones (lunate, capitate, etc) and point out how they articulate when the wrist flexes.
Review!
After you finish covering short bones, pause to review the differences between short and long bones using Flashcards. Flashcards 9-12 in the corresponding Deck cover short and long bones.
Flat bones
Flat bones protect the internal organs, so it’s important to show where these bones are located in context. An easy way to do this is through the systems panel. On the left side of the screen, you’ll see a panel with different options for the different body systems. By clicking on the options, you can instantly view all of the organs in the system. You can click on the system in the systems tray multiple times to make some organs visible or to make all of the organs in the system disappear from your view.
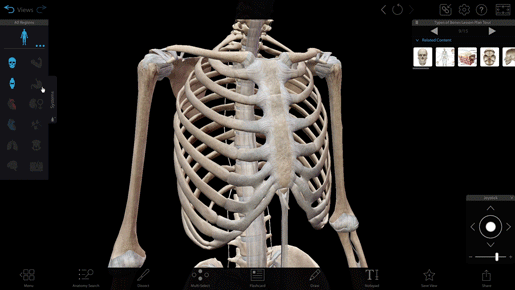
The systems tray feature in Visible Body Suite in Courseware.
Sesamoid bones
Sesamoid bones reinforce tendons, so the knee extension muscle action animation is a great way to show a sesamoid bone in action. Pause the animation to point out the tendons and the location of the patella.
Irregular bones
Irregular bones are complex shapes and fill several functions. You can show the vertebrae and show students how the unique shape allows for flexion and for protection of the spinal cord, or the complex, irregular shape of the sacrum. Next, play the “mind-blowing” disarticulated skull animation (Views > Systems > Skeletal System Views > 6. Disarticulated Skull), pausing to point out the flat bones (like the parietal bones) and irregular bones (like the sphenoid) in the skull. Rotate the model to show the shapes of the bones in 3D, helping students get a sense of spatial relationships.
Final review!
Next, it’s time for one more review using Flashcards. Flashcards 13-19 in the corresponding Deck cover all five types of bones. Using Flashcards is an easy way to gamify the classroom—check out this blog post for more gamification ideas.
Explore clinical applications
A great way to reinforce information is to apply it to practical applications, and students will be more engaged when they see how content relates to their future careers. Below are two ideas for discussing types of bones in the context of pathology.
You can find the pathology models used in this section by going to Views and selecting Muscle and Bone Pathologies on the top toolbar. Scroll down to the Lower Limbs section and select 3. Osteoarthritis of the Knee Joint or 13. Tibial Stress Fracture.
Osteoarthritis
Explain osteoarthritis to your students: when the cartilage around the knee degenerates, the bone surfaces become exposed, creating subchondral cysts, osteophytes (bone spurs), and a lot of pain.
Use the osteoarthritis of the knee joint model as a jumping off point:
- What types of bones do we see in this model and what are their functions?
- How do the bones in the knee work together, and how does osteoarthritis affect the joint’s function?
- Discuss the role of cartilage in joints.
.jpg?width=515&height=290&name=My%20project%20(40).jpg)
3D interactive osteoarthritis of the knee model in Visible Body Suite, part of Courseware.
Tibial stress fracture
Zoom in to show the microfractures in the tibial stress fracture model. Ask students what a stress fracture is; depending on the class level, you may need to walk them through the definitions of “stress” and “fracture” to arrive at the correct answer.
Discuss these points with your students:
- What type of bone is the tibia?
- Think about the function of long bones. Why do you think this tibia incurred a stress fracture?
Create an assignment for types of bones
Now it’s the students’ turn! Ask students to create their own Tours in Visible Body Suite that feature two examples of each type of bone. Students should add a label to the bone and add a note using the notepad tool that includes what type of bone it is. Students can use the share feature to share a link to their Tour!
Below is an example of directions you can give to your students for this assignment. As a reminder, you can copy this premade assignment to your course in Courseware by following the instructions at the beginning of the blog post!
Types of Bones Assignment:Create a Tour in Visible Body Suite that presents two examples of each type of bone: flat, long, short, sesamoid, and irregular. Tours are a collection of views, which are like slides on a presentation. For this assignment, you will: - Create a tour with ten different views; include two bones for each of the five types of bones. - Add a label to the bone. - Using the notepad, write which type of bone it is. - Name your Tour "[Your name] Types of Bones.” - Paste a link to your Tour here to turn it in. How to create and turn in a Tour:Tours are a series of saved Views. To create a view, position the model and add any tags, drawings, or notepad notes you want. Click on the "Save View" star on the bottom toolbar and give your view a name. To create a Tour, go back to the Visible Body Suite menu and click on "My Library" at the top. Next, click on "Tours" and then "Start." Click on the favorite views you want to add to your Tour and then click Save. Name your Tour "[Your name] Types of Bones." Need help? Here is a video that walks you through the creation of a Tour: https://www.youtube.com/watch?v=POzcvy6ZBm4&ab_channel=VisibleBodySupport Share your Tour by clicking on the three dots on the Tour thumbnail, clicking "Share Tour," and copying the link. Paste the link here to turn in your assignment for credit. |
One final note on this assignment: Sesamoid bones may be difficult for students to find on their own, so you may want to instruct them to find the patella (kneecap) and the pisiform (located in the hand) to add to their Tours.
More Resources
Visible Body’s anatomy education resources library is packed with lab activities, premade courses, Flashcards, Tours, and more. You can also check out the other lesson plans on the blog. Here are three you might be interested in:
- Free AR Lesson Plan: The Anatomy and Physiology of the Eye
- Free Lesson Plan: Anatomical Planes, Positions, and Directional Terms
- A Heart Rate Lesson Plan Using Physiology & Pathology
Happy teaching!

Be sure to subscribe to the Visible Body Blog for more awesomeness!
Are you an instructor? We have award-winning 3D products and resources for your anatomy and physiology or biology course! Learn more here.
