5 Ways to Teach Trauma Assessment with Visible Body
Posted on 12/11/24 by Sarah Boudreau
Visible Body provides the tools to help teachers teach and students learn the anatomy and physiology behind trauma assessment—from high schoolers taking CTE classes to college students studying for their EMT certification exams.
In this blog post, we’ll show you five ways you can use Visible Body Suite and Courseware to teach trauma assessment, from the ABCs of trauma and beyond.


It’s Easy to Find What You Need
Before we get started with teaching trauma assessment, here’s one of the best things about VB Suite: finding what you need is easy.
We’re not going to cover every single model in VB Suite that’s relevant to trauma assessment—we’d be here all day! VB Suite has a vast library of content, but thanks to its search and filter tools, finding what you need is simple.
For example, if I click on the search tab and type in “lung,” I can instantly view content like…
- Gross anatomy models of the hilum, pulmonary circulation, respiratory innervation, and more
- Cross sections of the thorax
- Animations that explain everything from external respiration to COPD
- Histology slides and illustrations
- Chapters from VB Suite’s interactive A&P course
Additionally, it’s quick and easy to view additional structures while you’re viewing a gross anatomy model. All you need to do is type the structure name into the “Anatomy Search” tool and add it to the view—if I’m exploring the thoracic cage view, I can quickly add the lungs, pleurae, and diaphragm to further understand the spatial relationships at play.
1. Tour the Trachea
Let’s begin with the anatomy and physiology behind airway management. The Trachea and Carotids view is a good place to start—simply search for “trachea” and it will pop up.
Using VB Suite as a visual aid through a projector, interactive panel, or through screen sharing, follow air’s pathway from the nose and mouth to the lungs and observe the cartilaginous rings that surround the trachea.
Use the Systems Tray to add the lymphatic, muscular, endocrine, and nervous systems to your view. Now, you can observe the trachea’s location in conjunction with the thyroid gland, the sternohyoid and sternocleidomastoid muscles, the inferior thyroid vein, and other structures.

GIF from VB Suite.
As you walk your students through airway anatomy, use the Draw tool to illustrate obstructions, pressure from other structures resulting in tracheal deviation, and other scenarios.
Now that your students are familiar with the anatomy involved, this is a great jumping-off point to discuss airway management techniques, placement of adjuncts, and other hands-on skills!
2. Live, Laugh, Lungs
Using the Heart and Lungs gross anatomy lab (GAL) view in VB Suite, you can simulate a cadaver dissection to show students how the layers of intercostal muscles and pleura sit deep to the ribs and cover the lungs. You can use the Dissect tool to dissect away structures with a single click, or for more precision, you can click on a structure and hit the H key to hide it.
.jpg?width=515&height=292&name=screenshot%20(35).jpg)
GAL view in VB Suite.
However, instructors often want students to learn the basics—like the anatomy and physiology of respiration—at home so they can use precious classroom time to focus on practical skills or more complex topics. This is where Courseware assignments shine.
Courseware assignments create an “on the rails” experience for students to explore anatomy and complete quizzes. In a Courseware assignment, 3D models, animations, histology slides, and illustrations are paired with instructions that guide students through the content and with bite-sized quizzes to check their understanding.

A premade assignment in Courseware.
With Courseware, instructors can create their own assignments or pull from a bank of premade assignments and lab activities that cover all major body systems, including several for the respiratory system. These premade immersive assignments are available through the premade courses Anatomy and Physiology: Essential Concepts and Anatomy and Physiology: Lab Activities.
3. Get to the Heart of Circulation
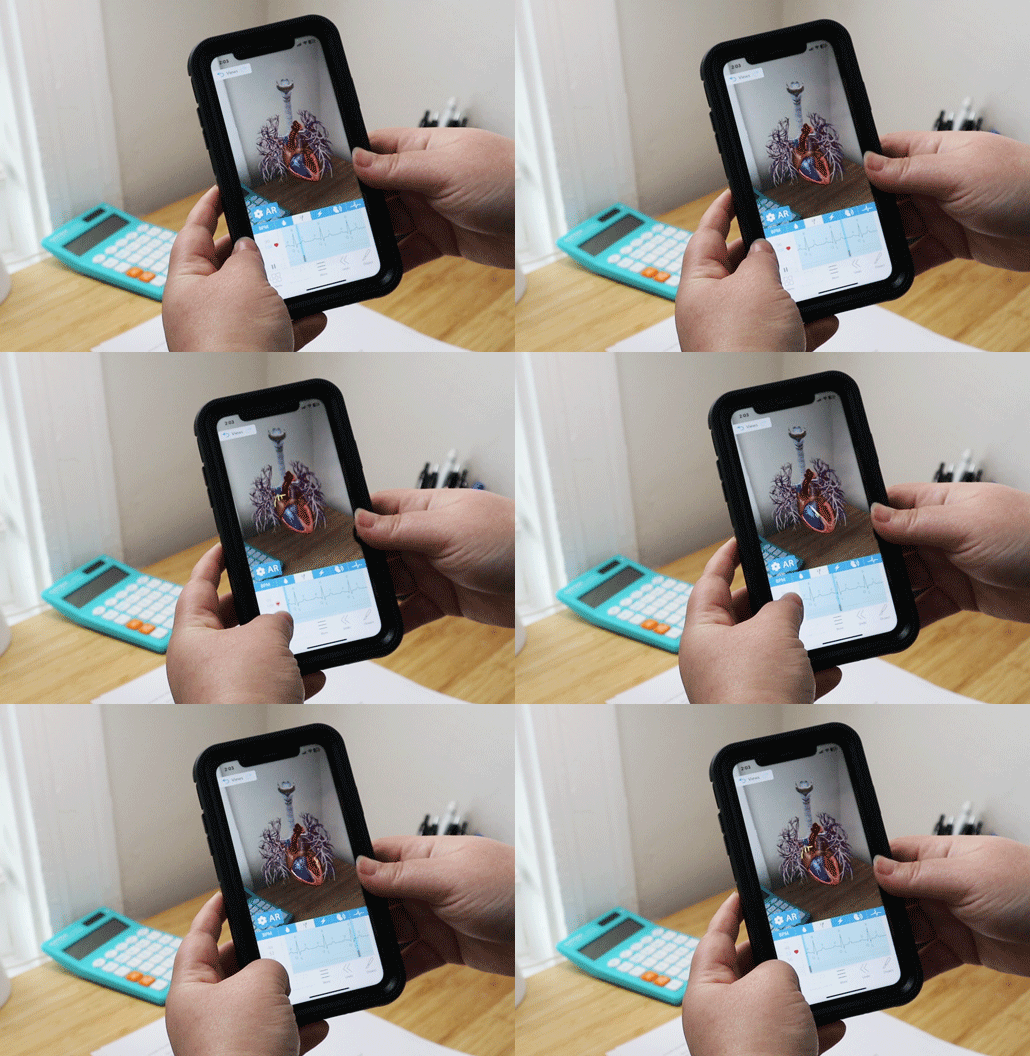
VB Suite’s interactive beating heart model is a crowd favorite, and for good reason—you can adjust the BPM, show how electrical impulses move through the heart, and observe the movement of blood through the chambers.

Beating heart model in AR via the VB Suite mobile app.
On a more basic level, you can use Visible Body to show students where to take the pulse of a patient. Students are probably already familiar with taking a pulse, but it’s important to understand the anatomy involved—with VB Suite, you can view the radial, carotid, and femoral arteries, then use the Systems Tray to add the skin. Then, by fading the skin, you can see the arteries in full context and see where to measure the pulse.

The Fade tool in VB Suite.
Looking for more heart lesson content? You can teach a basic introduction to the heart rate with this lesson plan from the blog!
4. Abdomen Palpation in a Flash
With the help of tags and annotation tools, students will quickly understand the process of palpating the abdomen.
Using the Draw tool, divide the abdomen into the four quadrants. As you talk your way through each quadrant, add tags to structures like the liver, appendix, and each part of the colon. Remember, your drawings and annotations are in 3D, so they will follow as you continue to manipulate and explore the model.
After students have an overview of the four quadrants, it’s time for them to create a Flashcard Deck! By creating Flashcards, students practice metacognition, show their knowledge, and create a study tool they can use later—and because Flashcard Decks are shareable, students can turn their Decks in for a grade.

Flashcard in VB Suite.
The assignment detailed below is adapted from this bony landmarks Flashcard assignment designed by Visible Body Customer Engagement Specialist Jenn Smulligan. At the end of this blog post, you’ll find instructions for how to copy the full version of this assignment (including instructions on how to create and share Flashcards) to your Courseware course!
Abdomen Quadrant Flashcards
For this assignment, you will create a Flashcard Deck of important structures in each of the four abdominal quadrants.
Here are the requirements for your Flashcard Deck:
- The Deck must have a minimum of 10 cards
- The Deck must show a minimum of 10 structures
- Each Flashcard must clearly show the quadrants (use the Draw tool to draw the quadrant borders)
- You can write your own Flashcard prompts, or you can use the automatic ID feature
5. A&P in the “Real World”
“When are we going to actually use this?” is the refrain of the bored student. When instructors connect A&P to practice, students become more engaged.
In this assignment, students will break up into small groups and use Tours to present antimonial structures key to trauma assessment. A Tour is a series of custom Views that create an interactive 3D presentation. Instead of using boring 2D slides, your students can add their own annotations and notes to 3D visuals, zooming in and manipulating the models to illustrate their points.
This activity uses the National Registry of Emergency Medical Technicians’ trauma assessment exam rubric as a guide, but you are more than welcome to adapt this assignment for your class’s needs.
You can access a full version of this assignment (including instructions on how to create and share a Tour) through Courseware. Instructions to do so can be found at the end of this post!
Trauma Assessment A&P Presentation Assignment
In this project, you will work in a small group to present the A&P knowledge that you would put into practice in an EMT certification exam.
Your group will be assigned one of the following categories. Each one is taken from the National Registry of Emergency Medical Technicians’ trauma assessment exam:
- Airway and breathing
- Circulation
- Head
- Neck
- Chest
- Abdomen/pelvis
- Lower and upper extremities
- Posterior thorax, lumbar, and buttocks
You will use the Tours feature in Visible Body Suite as a visual aid. Your presentation must include five key structures from your assigned category. Each structure must include its:
- Description
- Location
- Function
- Relevance to trauma assessment
You will have a maximum of 10 minutes to deliver your presentation, and all members should speak an equal amount of time.
Use these assignments in your course
Visible Body Courseware is a robust LMS platform that uses VB Suite’s stunning visuals to make teaching and learning easy—Courseware can be used as a standalone LMS or it can be integrated with a number of other LMS platforms.
We’ve created a version of the Tour and Flashcard assignments in Courseware, complete with instructions for both students and instructors.
If you don’t have access to Courseware yet, reach out to our team for a free instructor trial!
If you already have Courseware, follow these steps to add this folder to your course in Courseware:
- Click on this link to add the lesson plan material to your Courseware account.
- In this new course, click on the Bulk Editing tool, select the relevant folder(s), and click Copy. Choose the destination course and folder and copy.
- Navigate to your existing course, where you will find the content you copied. Use the Bulk Editing tool to edit release and due dates and publish. If you have Canvas deep integration set up, deploy to Canvas.
Once this lesson content is copied to your account, you can customize it to fit your class’s unique needs!
Be sure to subscribe to the Visible Body Blog for more anatomy awesomeness!
Are you an instructor? We have award-winning 3D products and resources for your anatomy and physiology course! Learn more here.


