5 Tips for Moving Your Lab Online with Visible Body
Posted on 4/29/20 by Laura Snider
As society tries to mitigate the spread of COVID-19, we find ourselves in strange and uncertain times. There are a lot of things we’ve been forced to re-think quickly, and with the closing of schools and universities around the globe, education is at the top of the list. How can instructors continue to provide quality instruction to their students if campuses are closed? Many universities have switched from on-campus to online learning, but this has left instructors with little time to plan and adjust.
At Visible Body, our mission is to make it easy for instructors to teach part of a course (or all of a course) online, so we’ve put together this list of five tips for bringing your lab course online!
This article is based on a recent webinar given by VB Editorial Director Lori Levans—you can watch the full video here! In her presentation, Lori illustrated the basics of using Visible Body Courseware for a lab course using two of our premade courses: a Lab Assessments course, organized by topic, and a correlation for Marieb’s A&P lab manual.
We’ll refer to these same courses as we talk about how you can use Courseware to bring your lab course online.
If you need a quick refresher on how to download premade courses, check out this video:
1. Organize content into small bites
It’s important to organize an online lab course in a way that allows students to find the information they need and access assignments easily. The modular nature of assignments in Courseware makes it easy to present course content in bite-size chunks that allow students to see what they’re required to understand and to work through the material at their own pace.
To demonstrate this approach, here’s how the content is organized in the two courses Lori discusses in the webinar.
Lab Assessments course
Each topic in the Lab Assessments course starts with a series of exercises—that is, assignments that walk students through the central anatomical structures and physiology concepts they’ll need to know. Modules in these assignments can include animations, text with accompanying 3D models, text with illustrations, and 3D views students can explore to familiarize themselves with relevant structures.
The learning objectives listed in the description for each assignment make it clear to students what they are expected to understand after completing the modules.
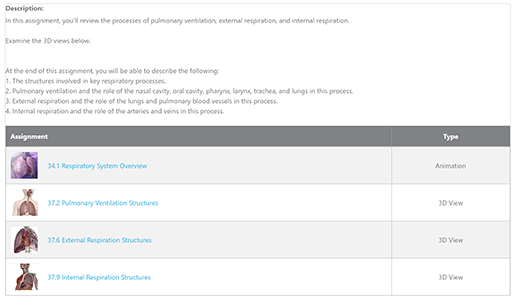
The description of this assignment contains instructions and a list of learning goals.
Following the exercises in each topic are a dissection quiz and a multiple-choice quiz. We’ll talk in more detail about quizzes later, but including both types of quizzes helps students master the material by testing their knowledge about the relevant structures and evaluating their understanding of key concepts.
Marieb lab manual correlation
VB’s premade lab manual correlations follow a similar model to the premade textbook correlations. The assignments in each chapter are organized as follows:
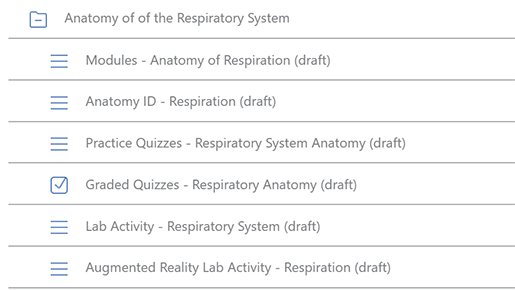
The layout of a chapter in the Marieb lab manual correlation course.
Modules. These are animations, illustrations, text, and 3D models from our Anatomy & Physiology app that present the basics of each topic in an interactive and visually engaging way.
Anatomy ID. This is a 3D view from Human Anatomy Atlas or Muscle Premium in which students can identify the structures they need to know by manipulating the model.
Practice Quizzes. The multiple-choice and dissection practice quizzes from the A&P app let students check their understanding of the material in a low-pressure way, then go back and review what they got wrong before they take graded quizzes.
Graded Quizzes. These multiple-choice and dissection quizzes from Courseware’s quiz bank allow students and instructors to track progress and test understanding. The results of graded quizzes go directly to the gradebook in Courseware.
VB Lab Activities. Visible Body has full lab activities, written by instructors, for every major body system. These can be assigned for credit or students can use them for practice.
Pathology Animations. Some chapters have a pathology section in which students can watch animations detailing specific pathologies related to the anatomy and physiology topic they’ve been studying.
2. Use the Calendar feature and notify your students by email when new assignments have been published
Continuing on the theme of making it easy for students to understand what they need to do and access the material they need to do it, let’s talk about the features of Courseware that allow instructors to release content gradually and notify students about new assignments.
Have students use the Calendar to keep track of due dates
It’s easy for students to use the Calendar to see which assignments are due when. To access the Calendar, students just need to go to the course’s main page and then click on the Calendar icon in the menu on the left side of the screen.
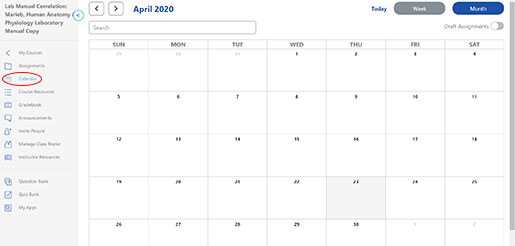
On the calendar page, students can view their assignments by month or by week. They can also use the search box to look for a specific assignment. Clicking on an assignment in the Calendar will bring up an info box that lists the title, due date, and a brief description. There will also be a link so students can go directly to the assignment from its calendar entry.
Send email notifications to the class
There are two main ways you can use Courseware to send emails to everyone in the class.
The first is to use the announcements feature, which you can access from the main course page via the menu on the left side of the screen. All you need to do to create a new announcement is use the button at the upper right—the text of your announcement will then appear on the announcements page, and you can check the “send email notification” box next to the “publish” button to send the announcement via email as well.
The second way to send emails using Courseware is to notify students when new assignments publish. Once you have an assignment that’s ready to publish, either immediately when you hit “publish” or with delayed release, check the “send email notification” button to let your students know when the assignment becomes available. With delayed release, the notification will be sent when the assignment publishes according to the scheduled release date.

3. Customize and add your own content to personalize premade courses
We’ve talked a lot about our premade courses, but just because they’re premade doesn’t mean you can’t adapt them to your own needs—in fact, we very much encourage instructors to edit our premade content as they see fit!
It’s super easy to edit preexisting assignments and to add your own content in Courseware.
If you want to change the description or content of an assignment you’ve already made or an assignment in a premade course, click on the assignment to view it. Then click the “Edit” button at the bottom of the screen. This will take you to a page where you can change the assignment’s title, release date, due date, folder, and description. If the assignment you’re editing is a graded quiz, you’ll see a few more options on this screen, such as quiz style (grading scheme, number of attempts, etc.) and quiz feedback.

If you want to change the assignment’s content (modules, views, quizzes, and so on), click the “Edit Assignment Content” button at the bottom of the screen. For graded quiz assignments, this will take you to the quiz bank, where you can add or remove quizzes from your assignment. For non-quiz assignments, the button will take you to the content selector for the app the assignment is based on. You can then add or remove modules, animations, or views as you wish.

To create a new assignment using your own content, go to the main page for your course and click the “Create New Assignment” button at the top right. From there, select one of the options under the “My Own Content” header. “Upload a file” will, as the name suggests, allow you to upload a PowerPoint, Word, Excel, .txt, or PDF. Link to URL will allow you to provide a link to a webpage, such as an article, blog post, or YouTube video. Once you’ve uploaded your file or entered your URL, you can choose the release date, due date, and folder for your assignment and edit its description.
Want to become a course-editing master? Check out this recent webinar on editing premade courses in Courseware with Lora Sandhusen!
4. Enable your students to test their knowledge with quizzes
Courseware’s collection of premade dissection and multiple-choice quizzes let students test their knowledge and track their progress. The best part is that these two types of Courseware quizzes are graded automatically and immediately—students and instructors can see the results of quiz attempts in the Gradebook right away. This is a win-win situation, saving time for instructors and reducing stress for students.
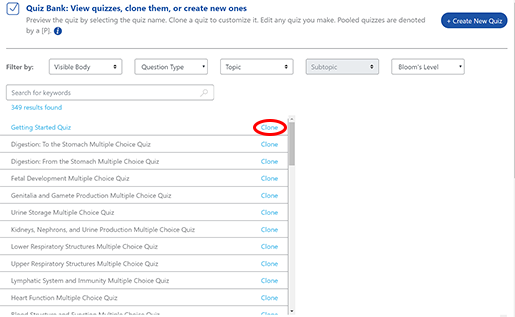
Although Courseware comes equipped with a sizable bank of ready-made quizzes, it’s easy to customize existing quizzes or create your own. Want to add or remove questions to a premade quiz, or even combine questions from multiple premade quizzes? No problem. All you need to do is go to the quiz bank, make a copy of the premade quiz, then edit it. You can then add and remove questions, adjust the order of the questions (our default is random), or even create a question pool, so each student will get a subset of the questions.
Once you’re ready to assign a quiz (or edit the options for a preexisting quiz assignment), there are plenty of different ways you can present questions and feedback. For example, you can present questions in a specific order, or let the order be random. You can also create a pool of questions for the quiz engine to pull on, so that each student only receives a subset of the existing questions.
Feedback on answers can be given after each question or all at the end of the quiz, so students can see which questions they got wrong and what the correct answers are. In addition, you can make timed quizzes, allow multiple attempts, and change the grading framework (points vs. percentage) and weighting.
Want to learn even more about creating quizzes in Courseware? Lori’s got another webinar! You can watch it here.
5. Transfer students' grades from Courseware to your LMS of choice
So you’ve downloaded or created a course, added content, and your students have completed their assignments. What now? Well, first of all, you can check your students’ grades using the Gradebook.
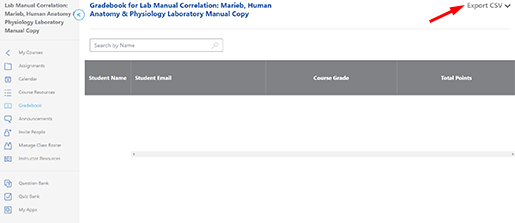
One of the coolest things about the Gradebook is that you can export your students' grades from Courseware and import them into the LMS your school uses for official grades. To export the contents of a course’s Gradebook to a CSV file, click the “Export CSV” button in the upper right corner and select the format that fits the LMS you use. We have custom CSV formats made to fit Blackboard, Moodle, D2L, Canvas, and Sakai, as well as an all-purpose format. Then, once you’re logged into your LMS, upload the CSV from your computer.
And there you go—a guide to bringing your lab course online, from assignment structure to getting all your grades in one place! If you have any questions about setting up your lab course with Visible Body Courseware, please don’t hesitate to contact us. Also, for more tips and tricks for teaching with Courseware, keep your eye out for new Visible Body webinars!
P.S. If you want to create your own course in Courseware following VB’s “learning path” format, check out this blog post that discusses how Lora Sandhusen, who helps customers learn how to use our products, designs her textbook correlation course assignments.
Be sure to subscribe to the Visible Body Blog for more anatomy awesomeness!
Are you an instructor? We have award-winning 3D products and resources for your anatomy and physiology course! Learn more here.


